[SFW]01
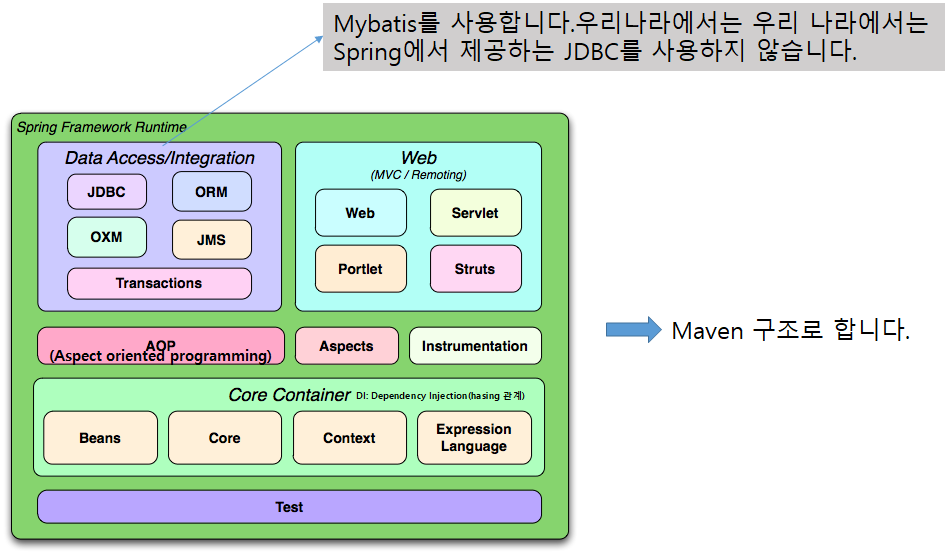
SpringFramework: 아래의 여러개의 모듈들이 합쳐진 것을 말합니다. 각각의 모듈들을 다 사용할 수 있지만, 그렇지 않을 수도 있습니다. spring의 jdbc는 우리나라에서는 Mybatis를 많이 사용합니다.
DI(Dependency Injection)
각각의 단계는 그 각각의 단계는 그전 단계에서 의해서 의존하게 됩니다. 예를 들어 service의 경우에는 DAO에 의존하게 되는데, DAO가 변경되었을때 일일이 모든것을 변경해줘야한다.
그렇기 때문에 코드의 재사용성을 높이기 위해서는 이런 의존성을 줄여야합니다. 즉, DAO를 독립적으로 만들어 줘야합니다. 이때 이부분에 사용되는 framework는 DI입니다.
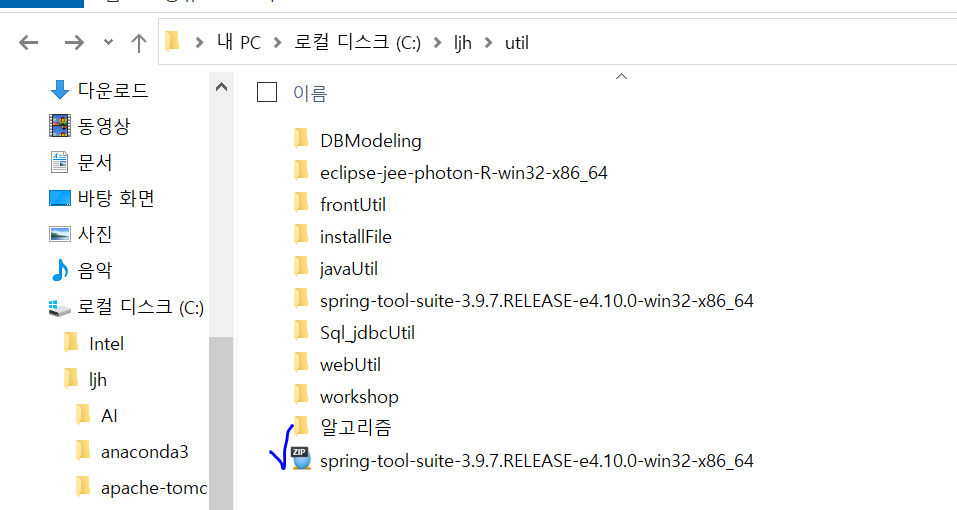
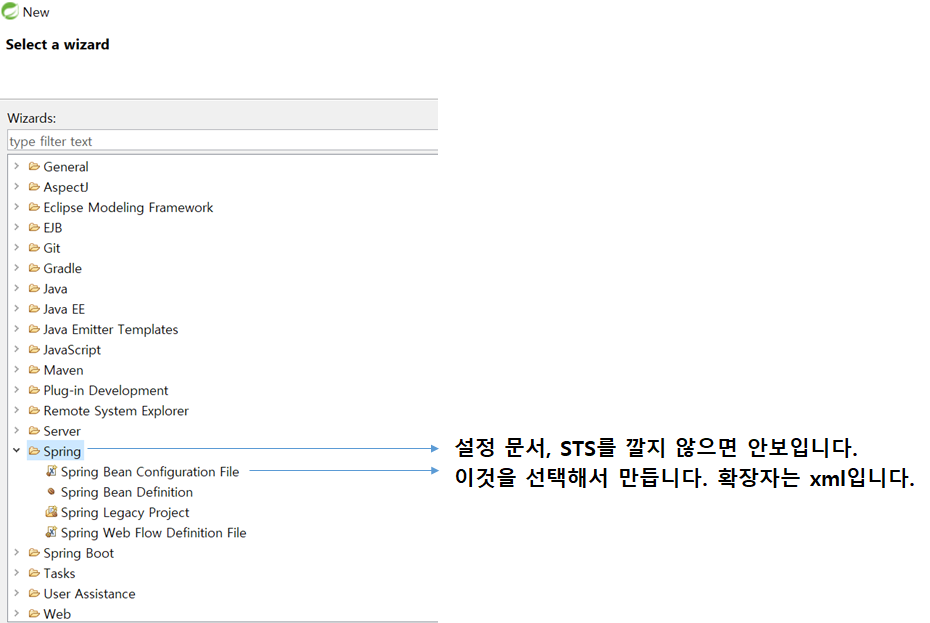
실습을 하기 위해서는 STS plugin이 있어야 하는데, 지금 제 버전에는 사용하는데 있어서 어려움이 있으므로, 이미 STS plugin이 있는 것을 새로 설치해서 사용합니다.
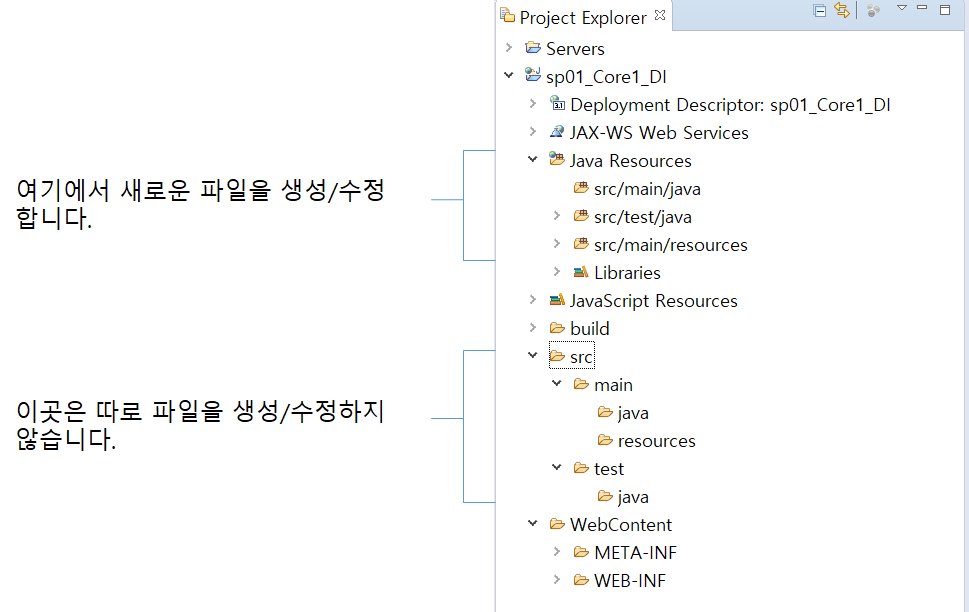
src 폴더 관리
- 원래 src에는 Java code가 들어갑니다.
-.html 같은 정적인 문서는 이 아래 들어오지 않습니다.
- Context.xml은 이전엔 여기 있었으나, 이제는 따로 둡니다.
- UnitTest: main이 있는 파일로 단위테스트에 쓰였던 파일들은 원래는 다같이 뒀었지만 이제는 따로 관리합니다.
->>>다각화 되어 있지 않은 src폴더를 다각화 시킵니다.
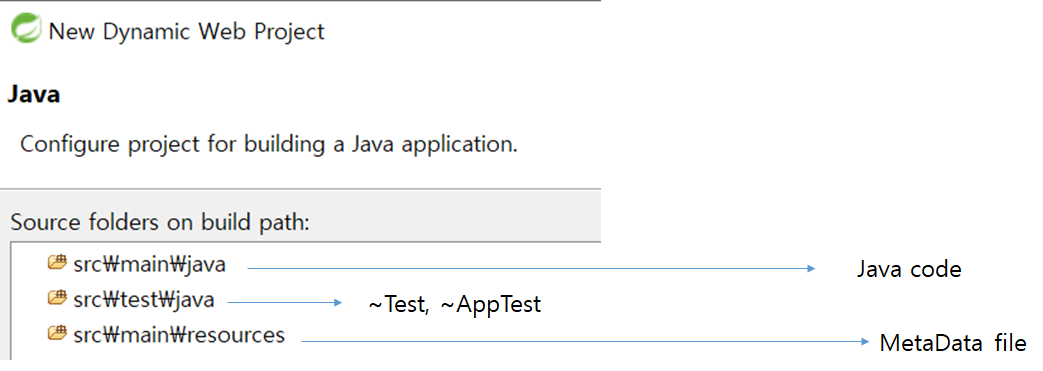
새로운 Dynamic web project를 만들 때, src를 삭제하고 아래와 위와 같이 src를 다각화 해줍니다.
DI 라이브러리
pring-framework-4.0.0.RELEASE-dist\spring-framework-4.0.0.RELEASE\libs
위 폴더를 들어가면

위와 같이 3개씩 짝지어진 압축파일들이 있습니다.
이중에서 javadoc,과 sources를 제외한 나머지 하나가 library입니다.
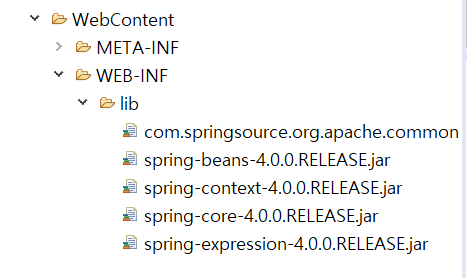
아래와 같은 네개의 라이브러리를 가져옵니다.
이것을 WEB-INF의 lib에 넣어 줍니다.
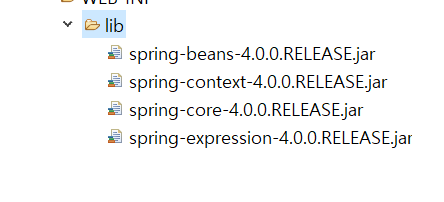
-> Spring framework는 라이브러리가 모듈화 되어 있습니다. core container(DI)에 필요한 라이브러리를 설치해 사용한다고해서 다른 모듈이 다 설치되는 것이 아니다. 내가 사용하는 모듈의 라이브러리를 가져와 사용하면 그거만 사용할 할 수 있습니다.
코드를 통한 내용파악
Hello.java
package spring.service.hello;

/*
 * FileName : Hello.java
 * ㅇ package / private Field(property) / Constructor / getter,setter / 필요한 Method
 * ㅇ를 갖는 빈 규약을 준한 일반적인 Bean ::  POJO(Plain Old Java Object)-> 어떤 첨가물도 없다. 그 어느것으로 부터 제약받지 않음, implement, extends없이 setter, getter로만 깔끔하게 있는 클래스
 */
public class Hello{

	///Field
	private String message = "Container 란 ?????";

	///Constructor Method
	public Hello() {
		System.out.println(getClass().getName()+"....instance create.....");
	}
	public Hello(String message) {
		this.message = message;
	}

	///Method
	//==> getter / setter Method definition
	public String getMessage() {
		return message;
	}
	public void setMessage(String message) {
		this.message = message;
	}

	//==> message 를 출력하는 Method
	public void printMessage() {
		System.out.println("\n"+getClass().getName()+"=>"+message);
	}

}//end of class
HelloTestApp01.java
package spring.service.hello.test;

import spring.service.hello.Hello;

/*
 * FileName : HelloTestApp01.java
 * ㅇ Hello.class 사용하는 Application
 */
public class HelloTestApp01 {

	///main method
	public static void main(String[] args) {
		//==>1. instance 생성
		Hello hello = new Hello();
		//==> 2. printMessage() method 호출
		hello.printMessage();
	}

}//end of class

/*
 * [ 고려할 사항 :: 다른 Bean 사용 및 출력 Message 변경 시... ]
 *
 * 1. new Hello() 의 instance 생성 하드코딩
 * 		-  Hello.class, 하위 class 또는 다른 class 사용을 할 경우
 * 			==>  다시 코딩 후 컴파일 과정 수행
 *
 * 2. 출력할 message 하드 코딩
 *		-  다른 message 를 출력코자 한다면
 *			==> 다시 코딩 후 컴파일 과정 수행 ( :: setter Method 를 사용하지 않은 경우로 한정 )
 *
 *  ==> 위의 하드코딩된 부분(1.instance 생성, 2.출력 message)을
 *  		text file(부가정보,Meta Data) 에 저장하고  Application 은 runtime 시  text 에 저장된 내용을
 *  		읽어 수행하는 구조라면,  사용 할 instance/message 에  변경사항이 발생하면 text만 수정
 *  		Application 은  text 를 통해 전달된 정보를 사용 함으로 Bean 은 수정 할 필요가 없다
 *         ( text/메타데이터의 활용 )
 */
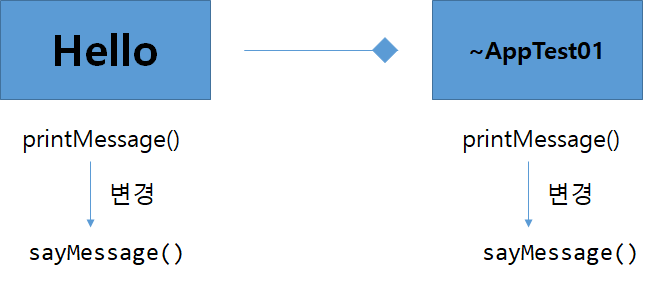
Hello의 printMessage가 sayMessage()로 변경되게 되면, Hello와 tightg한 coupling을 하고 있어 의존적인 AppTest01 또한 호출 함수를 바꿔야 합니다.
기존 방식의 문제와 코드 재사용성을 높이기 위한 방법
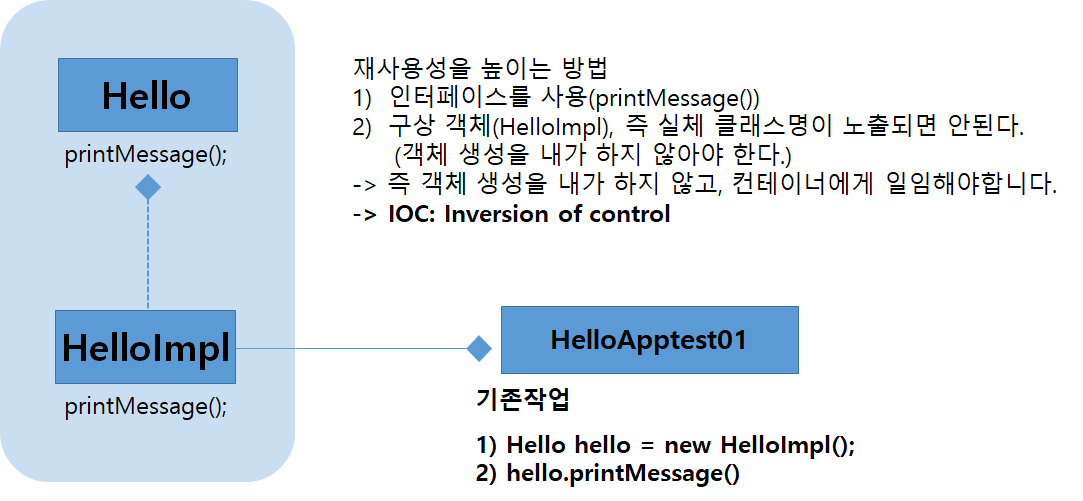
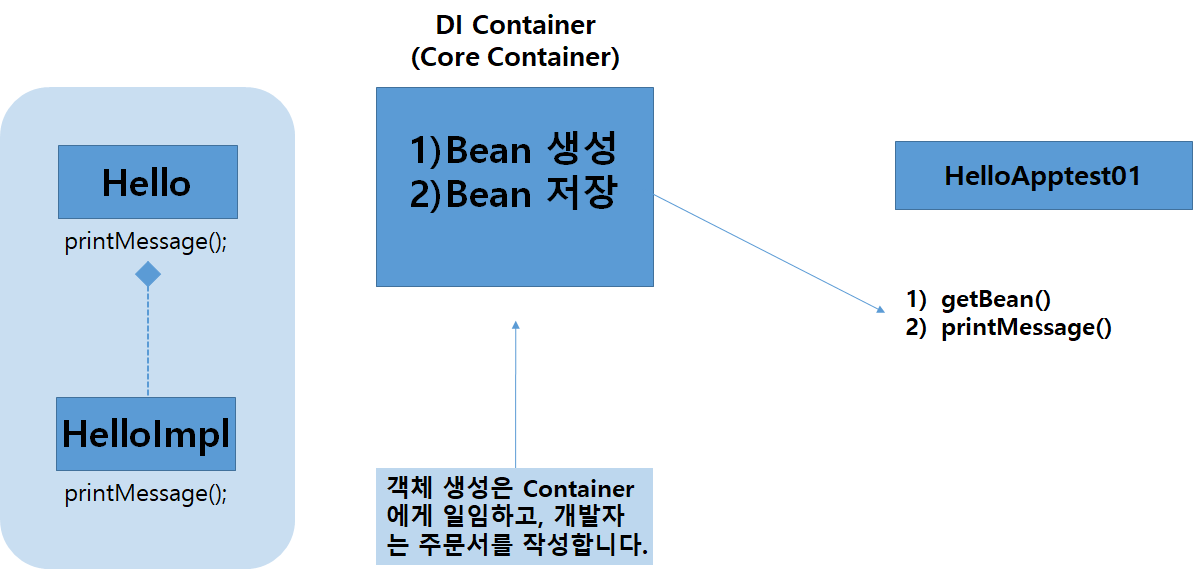
실제로 위와 같이 돌아 가는 DI 컨테이너는 우리가 볼 수 없습니다. 그래서 아래와 같은 역할을 하는 container가 있다고 볼 수 있습니다.
HelloFactory.java-> DI Container 역할을 합니다.
package spring.service.hello;

import java.io.FileInputStream;
import java.io.FileNotFoundException;
import java.io.IOException;
import java.util.Properties;

/*
 * FileName : HelloFactory.java
 * ㅇ hello.properties file(부가정보,Meta-Data) 의 내용을 읽어 Hello instance 를 생성 return.
 */
public class HelloFactory {
	///Field
	private Hello hello;
	private Properties properties;
	private static HelloFactory helloFactory;

	///Constructor Method
	private HelloFactory(){
	}

	///Method
	//==> HelloFactory instance 를  return 하는 static method(SingleTon)
	public synchronized static  HelloFactory getInstance() {
		if( helloFactory == null){
			helloFactory = new HelloFactory();
		}
		return helloFactory;
	}

	//==> properties file 을 추상화,캡슐화한  java.util.Properties instance 생성
	public void setConfigResource(String configResource) {
		FileInputStream fis = null;
		try {
			fis = new FileInputStream(configResource);
			properties = new Properties();
			properties.load(fis);
		} catch (FileNotFoundException e) {
			e.printStackTrace();
			throw new RuntimeException("1. hello.proerties 파일을 찾을수 없음.");
		} catch (IOException e) {
			e.printStackTrace();
			throw new RuntimeException("2. hello.proerties 파일 초기화 시 오류 발생.");
		}finally{
			if(fis != null){
				try {
					fis.close();
				} catch (IOException e) {
					e.printStackTrace();
				}
			}
		}
	}

  	//==> name 에 해당하는 instance 생성:: default constructor
	private void newInstanceHello(String name){

		String className = properties.getProperty(name).trim();  //==> trim() 앞뒤 공백 trim
		System.out.println("!! debug=>hello.properties 에서 추출한 className : "+className);

		try {
			Class  cls = Class.forName(className);
			Object obj = cls.newInstance();
			//==> Hello Instance 확인
			if( obj instanceof Hello){
				this.hello = (Hello)obj;
			}
		} catch (ClassNotFoundException e) {
			e.printStackTrace();
			throw new RuntimeException("1. "+className +"의 이름을 갖는 class가 없음.");
		} catch (Exception e) {
			e.printStackTrace();
			throw new RuntimeException("2. "+className +"의 instance 생성시 문제 발생.");
		}
	}

  	//==> Hello instance 생성하는 newInstanceHello() 호출 및 Hello instance 를 return
	public Hello getBean(String name){
		this.newInstanceHello(name);
		return hello;
	}

}//end of class
HelloTestApp02.java
package spring.service.hello.test;

import spring.service.hello.Hello;
import spring.service.hello.HelloFactory;
/*
 * FileName : HelloTestApp02.java
 * ㅇ Hello.class 를 사용하는 Application
 * ㅇ [ HelloTestApp01과 비교 ]
 * 		- 사용할  Bean 를 hello.properties(meta-data)에 text 로 저장 하고...
 * 		- instance 를 직접 생성하지 않으며, HelloFactory 에서 return 되는 instance 사용.
 */
public class HelloTestApp02 {

	///main method
	public static void main(String[] args) {

		// 1. 사용할 Bean  정보를 갖는  hello.properties(meta-data)를
		//      parsing, Bean instance를 생성할 HelloFactory  instance 생성
		HelloFactory helloFactory =	HelloFactory.getInstance();

		// 2.  helloFactory instance 로 parsing 할 resource::meta-data(hello.properties) 전달
		helloFactory.setConfigResource("./src/main/resources/config/hello.properties");

		// 3. helloFactory instance 로 부터 instance.one 이름을 갖는 Hello instance Request
		Hello hello = helloFactory.getBean("instance.one");

		// 4.  printMessage() 호출
		hello.printMessage();
	}

}//end of class


/*
 * [[[[[[ HelloTestApp01 고려할 사항 ]]]]]] 과 비교
 *
 * [ 고려할 사항 :: 다른 Bean 사용 및 출력 Message 변경 시... ]
 *
 * 1. new Hello() 의 instance 생성 하드코딩
 * 		-  Hello.class, 하위 class 또는 다른 class 사용을 할 경우
 * 			==>  다시 코딩 후 컴파일 과정 수행
 *     [[[[[[ HelloTestApp02 변경 ]]]]]]
 *     		 : 다른 Bean 사용할 경우 hello.properties 의 내용을 변경한다면....
 *          ==>[한번더 고려...]
 *          ==> 현재는 Data Type  Hello 임으로 Hello 만 생성 관리 가능
 *          ==> 다른 Data type 의 생성은....
 *                  (HelloFactory는 Hello Type 만 생성 관리 한다....)
 *
 * 2. 출력할 message 하드 코딩
 *		-  다른 message 를 출력코자 한다면
 *			==> 다시 코딩 후 컴파일 과정 수행 ( :: setter Method 를 사용하지 않은 경우로 한정 )
 *     [[[[[[ HelloTestApp02 변경 ]]]]]]
 *     		 : HelloTestApp02는 미적용 다음예제에서...
 *			 ==> hello.properties 에 Message 를 저장 불러올 수 있다면....
 *
 *
 *  ==> 위의 하드코딩된 부분(1.instance 생성, 2.출력 message)을
 *  		text file(부가정보,Meta Data) 에 저장하고  Application 은 runtime 시  text 에 저장된 내용을
 *  		읽어 수행하는 구조라면,  사용 할 instance/message 에  변경사항이 발생하면 text 만 수정
 *  		Application 은  text 를 통해 전달된 정보를 사용 함으로 Bean 은 수정 할 필요가 없다
 *         ( text/메타데이터의 활용 )
 */
hello.properties
# use instance FQCN
instance.one=spring.service.hello.Hello
아직도 고려할 사항이 남아 있습니다.
hello.xml
<?xml version="1.0" encoding="UTF-8"?>
<beans xmlns="http://www.springframework.org/schema/beans"
	xmlns:xsi="http://www.w3.org/2001/XMLSchema-instance"
	xsi:schemaLocation="http://www.springframework.org/schema/beans http://www.springframework.org/schema/beans/spring-beans.xsd">
	<!-- Hello hello = new Hello() 이것과 아래는 같습니다. 값의 주입 없이 instance를 만들었습니다. -->
	<bean id="hello" class="spring.service.hello.Hello" />

</beans>
Beans tag안에 있는 bean tag는 실체 객체의 개수와 같습니다. Hello hello = new HelloImpl()에서 Id는 hello와 같습니다. class에는 FQCN을 넣어줍니다. id와 class는 baen의 필수 속성입니다.
HelloTestApp03UserSpring.java
package spring.service.hello.test;

import org.springframework.beans.factory.BeanFactory;
import org.springframework.beans.factory.xml.XmlBeanFactory;// 이렇게 줄이 가있는거는 이제 지원 안할 수도 있다는 건데, 지금은 원시적인걸 보기 때문에 한번 해봅니다.
import org.springframework.core.io.FileSystemResource;

import spring.service.hello.Hello;

public class HelloTestApp03UserSpring {
/*
 * 파일 읽어 올때,
 * ClassPathSystem --src를 이미 먹고 들어간다.
 * FilePathSystem --src부터 다시 인식 시켜야한다.
 */
	public static void main(String[] args) {
		// TODO Auto-generated method stub
		//1. BeanFactory 생성...주문서는 공장에서 미리 받아서 읽어놔야한다.
		//BeanFactory 생성할때 주문서 함께 인자값으로 넣어준다.
		// Bean configuration File(bean 설정문서)

		//container
		System.out.println("1. BeanFactory생성");
		BeanFactory factory = new XmlBeanFactory(new FileSystemResource("./src/main/resources/config/hello.xml"));//현재 FilePathSystem인데, classPathSytem이 좋다.

		//2. getBean()으로 bean을 하나 받아 와서 printMessage()호출
		System.out.println("2. getBean()...클라이언트호출...");
		Hello hello= (Hello)factory.getBean("hello");//preloading과 lazy loading이 있는데, 이경우에는 생성자를 통해서 확인해 보니, lazy loading이었습니다.
		hello.printMessage();
	}

}
-> 또한, BeanFactory를 생성해 test를 할때 보면 아래와 같은 error가 생기게 됩니다.
Exception in thread "main" java.lang.NoClassDefFoundError: org/apache/commons/logging/LogFactory라이브러리가 없다는 에러입니다. springframework의 라이브러리 이외에도 다른 라이브러리가 필요합니다. 아파치의 라이브러리가 필요합니다. 다운받아서 WEB-INF/lib에 넣습니다.
spring-framework-3.0.2.RELEASE-dependencies\org.apache.commons\com.springsource.org.apache.commons.logging\1.1.1
위 라이브러리입니다.
아래와같이 Spring 라이브러리 4개, 아파치 라이브러리 1개입니다.
greet 예제를 통해서 bean configuration을 연습해 봅니다.
Greet.Java
package spring.service.greet;

public class Greet{

	///Field
	private String message;


	///Constructor Method
	public Greet() {
		System.out.println(getClass().getName()+"....instance create.....");
	}
	public Greet(String message) {
		this.message = message;
	}

	///Method
	//==> getter / setter Method definition
	public String getMessage() {
		return message;
	}
	public void setMessage(String message) {
		this.message = message;
	}

	//==> message 를 출력하는 Method
	public void printMessage() {
		System.out.println("\n"+getClass().getName()+"=>"+message);
	}

}//end of class
greet.xml
<?xml version="1.0" encoding="UTF-8"?>
<beans xmlns="http://www.springframework.org/schema/beans"
xmlns:xsi="http://www.w3.org/2001/XMLSchema-instance"
xsi:schemaLocation="http://www.springframework.org/schema/beans http://www.springframework.org/schema/beans/spring-beans.xsd">
<!-- Bean:: API Bean | User Definition Bean(아래 세개는 다 이거임) -->
<!-- 주입방법:: 생성자주입|setter 주입 -->
<!-- 1. greet1 이라는 이름으로 greet 객체를 생성 (User Definition Bean)-->
<bean id = "greet" class="spring.service.greet.Greet" />
<!-- 2.greet2라는 이름으로 Greet 생성(User Definition Bean), 생성자 값 주입...Hello Spring!!! -->
<bean id="greet2" class="spring.service.greet.Greet">
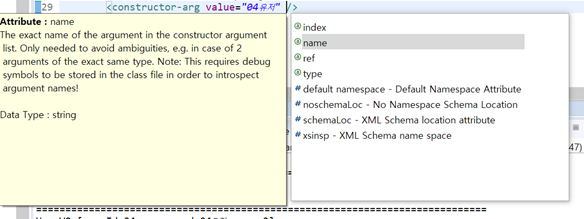
<constructor-arg value ="Hello Spring" />
</bean>
<!-- 3. greet3이라는 이름으로 Greet 생성(User Definition Bean), setter(property)로 값 주입.. Hi Spring DI!! -->
<bean id = "greet3" class="spring.service.greet.Greet">
<!-- greet3.setMessage() message가 name쪽에 써진다, 그리고 값은 value에 넣는다. -->
<property name="message" value="Hi Spring DI!!" />
</bean>
<!-- API Bean| String str = new String("스프링 빈 설정문서 만들기") -->
<bean id ="str" class ="java.lang.String">
<constructor-arg value="스프링 빈 설정문서 만들기" />
</bean>
<bean id = "greet4" class="spring.service.greet.Greet">
<property name="message" ref="str" />
</bean>
</beans>
GreetTestApp03UserSpring2.java
package spring.service.hello.test;

import org.springframework.beans.factory.BeanFactory;
import org.springframework.beans.factory.xml.XmlBeanFactory;// 이렇게 줄이 가있는거는 이제 지원 안할 수도 있다는 건데, 지금은 원시적인걸 보기 때문에 한번 해봅니다.
import org.springframework.core.io.FileSystemResource;

import spring.service.greet.Greet;

public class GreetTestApp03UserSpring2 {

	public static void main(String[] args) {

		// 1. BeanFactory 생성...주문서는 공장에서 미리 받아서 읽어놔야한다.
		// BeanFactory 생성할때 주문서 함께 인자값으로 넣어준다.
		// Bean configuration File(빈 설정문서)

		// container
		System.out.println("1. BeanFactory생성");
		BeanFactory factory = new XmlBeanFactory(new FileSystemResource("./src/main/resources/config/greet.xml"));
		// 현재 FilePathSystem인데, classPathSytem이 좋다.

		// 2. getBean()으로 bean을 하나 받아 와서 printMessage()호출
		System.out.println("2. getBean()...클라이언트호출...");

		Greet g1 = (Greet) factory.getBean("greet1");
		// preloading과 lazy loading이 있는데, 이 경우에는 생성자를 통해서 확인해 보니, lazy loading이었습니다.
		g1.printMessage();

		Greet g2 = (Greet) factory.getBean("greet2");
		g2.printMessage();

		Greet g3 = (Greet) factory.getBean("greet3");
		g3.printMessage();

		Greet g4 = (Greet) factory.getBean("greet4");
		g4.printMessage();
	}

}
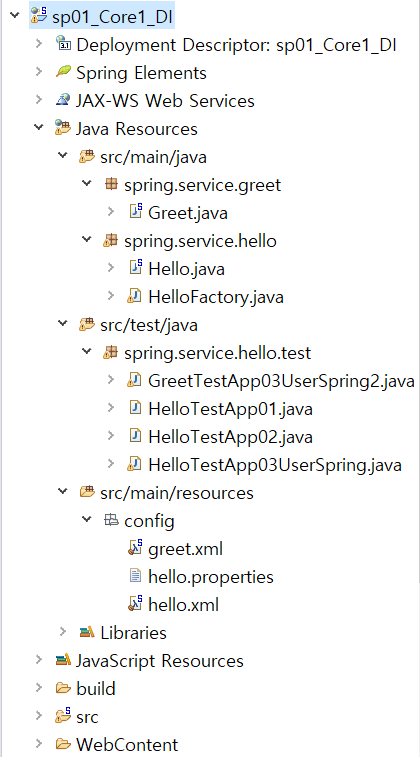
greet와 hello의 디렉토리

아래 예제를 통해서 interface 얼마나 중요한지 알아 봅니다.
DiceA.java
package spring.service.dice;

import java.util.Random;

// pojo입니다.


/*
 * FileName : DiceA.java
 * ㅇ 주사위 Object Modeling
 * ㅇ 1 ~ 6 수를 랜덤하게  리턴
 */
public class DiceA {

	///Field
	private int value;

	///Constructor
	public DiceA() {
		System.out.println("::"+getClass().getName()+" 생성자....");
	}

	//Method (getter/setter)
	public int getValue() {
		return value;
	}
	public void setValue(int value) {
		this.value = value;
	}

	//==> 주사위를 던저 선택되는 숫자를 생산하는 행위(무작위로 숫자 생산)
	public void selectedNumber(){
		value = new Random().nextInt(6) + 1;
	}

}//end of class
DiceB.java
package spring.service.dice;

import java.util.Random;

/*
 * FileName : DiceB.java
 * ㅇ 주사위 Object Modeling
 * ㅇ 1 ~ 6 수를 랜덤하게  리턴
 */
public class DiceB {

	///Field
	private int value;

	///Constructor
	public DiceB() {
		System.out.println("::"+getClass().getName()+" 생성자....");
	}

	//Method (getter/setter)
	public int getValue() {
		return value;
	}
	public void setValue(int value) {
		this.value = value;
	}

	//==> 주사위를 던저 선택되는 숫자를 생산하는 행위(무작위로 숫자 생산)
	public void selectedNumber(){
		value = new Random().nextInt(6) + 1;
	}

}//end of class
DiceC.java
package spring.service.dice;

import java.util.Random;

/*
 * FileName : DiceC.java
 * ㅇ 주사위 Object Modeling
 * ㅇ 1 ~ 6 수를 랜덤하게  리턴
 */
public class DiceC {

	///Field
	private int value;

	///Constructor
	public DiceC() {
		System.out.println("::"+getClass().getName()+" 생성자....");
	}

	//Method (getter/setter)
	public int getValue() {
		return value;
	}
	public void setValue(int value) {
		this.value = value;
	}

	//==> 주사위를 던저 선택되는 숫자를 생산하는 행위(무작위로 숫자 생산)
	public void selectedNumber(){
		value = new Random().nextInt(6) + 1;
	}

}//end of class
DiceA를 hasing하는 Player01 class
Player01.java
package spring.service.dice.play;

import spring.service.dice.DiceA;

/*
 *	FileName : Player01.java
 *	ㅇ DiceA 을 가지고(?, has a :: Association Relationship)있는 Player Object Modeling
 *  ㅇDiceA 를 사용 합을 리턴하는 Method 정의
 */
public class Player01 {

	///Field
	private DiceA diceA = new DiceA();
	private int totalValue;

	///Constructor Method
	public Player01() {
	}

	///Method (getter/setter)
	public DiceA getDiceA() {
		return diceA;
	}
	public void setDiceA(DiceA diceA) {
		this.diceA = diceA;
	}
	public int getTotalValue() {
		return totalValue;
	}
	public void setTotalValue(int totalValue) {
		this.totalValue = totalValue;
	}

	//==> count 만큼 주사위를 굴려서 합을 후하는 행위
	public void playDice(int count){

		System.out.println("==>"+getClass().getName()+".playDice() start....");

		for (int i = 0; i < count; i++) {
			diceA.selectedNumber();
			System.out.println("::[ "+diceA.getClass().getName()+" ] 의 선택된수 : "+diceA.getValue());
			totalValue += diceA.getValue();
		}

		System.out.println("==>"+getClass().getName()+".playDice() end....");
	}

}//end of class
DiceTestApp01.java
package spring.service.dice.test;

import spring.service.dice.play.Player01;

/*
 * FileName : DiceTestApp01.java
 * ㅇ DiceA / Player01 Test 하는 Application
 */
public class DiceTestApp01 {
	///Main Method
	public static void main(String[] args){

		Player01 player01 = new Player01();
		player01.playDice(3);
		System.out.println("=======================");
		System.out.println("선택된 주사위 수의 통합은 : "+player01.getTotalValue());
		System.out.println("=======================");

	}
}//end of class
위의 코드들은 Player01이 diceA만 사용할 수 있습니다. 다른 주사위를 사용하려면 일일이 다 바꿔줘야합니다. 이를 개선하기위해서 인터페이스를 통해서 재사용성이 높게 만들어 봅니다.
<<interface>>
Dice.java
package spring.service.dice;

public interface Dice {
	int getValue();
	void selectedNumber();
}
DiceAImpl.java
package spring.service.dice.impl;

import java.util.Random;

import spring.service.dice.Dice;

public class DiceAImpl implements Dice{

	private int value;

	///Constructor
	public DiceAImpl() {
		System.out.println("::"+getClass().getName()+" 생성자....");
	}

	@Override
	public int getValue() {
		return value;
	}

	@Override
	public void selectedNumber() {
		value = new Random().nextInt(6) + 1;
	}

}
DiceBImpl.java
package spring.service.dice.impl;

import java.util.Random;

import spring.service.dice.Dice;

public class DiceBImpl implements Dice{

	private int value;

	///Constructor
	public DiceBImpl() {
		System.out.println("::"+getClass().getName()+" 생성자....");
	}

	@Override
	public int getValue() {
		return value;
	}

	@Override
	public void selectedNumber() {
		value = new Random().nextInt(6) + 1;
	}

}
DiceCImpl.java
package spring.service.dice.impl;

import java.util.Random;

import spring.service.dice.Dice;

public class DiceCImpl implements Dice{

	private int value;

	///Constructor
	public DiceCImpl() {
		System.out.println("::"+getClass().getName()+" 생성자....");
	}

	@Override
	public int getValue() {
		return value;
	}

	@Override
	public void selectedNumber() {
		value = new Random().nextInt(6) + 1;
	}

}
Player02.java
package spring.service.dice.play;

import spring.service.dice.Dice;

public class Player02 {

	///Field
	private Dice dice;
	private int totalValue;

	///Constructor Method
	public Player02() {
	}
	public Player02(Dice dice) {
		this.dice = dice;
	}

	///Method (getter/setter)
	public Dice getdice() {
		return dice;
	}
	public void setdice(Dice dice) {
		this.dice = dice;
	}
	public int getTotalValue() {
		return totalValue;
	}
	public void setTotalValue(int totalValue) {
		this.totalValue = totalValue;
	}

	//==> count 만큼 주사위를 굴려서 합을 후하는 행위
	public void playDice(int count){

		System.out.println("==>"+getClass().getName()+".playDice() start....");

		for (int i = 0; i < count; i++) {
			dice.selectedNumber();
			System.out.println("::[ "+dice.getClass().getName()+" ] 의 선택된수 : "+dice.getValue());
			totalValue += dice.getValue();
		}

		System.out.println("==>"+getClass().getName()+".playDice() end....");
	}

}//end of class
DiceTestApp02.java
package spring.service.dice.test;

import spring.service.dice.impl.DiceAImpl;
import spring.service.dice.impl.DiceBImpl;
import spring.service.dice.impl.DiceCImpl;
//Spring을 안쓰고 인터페이스만으로 이렇게 재사용성을 높일 수 있다.
import spring.service.dice.play.Player02;

public class DiceTestApp02 {
	///Main Method
	public static void main(String[] args){

		Player02 player01 = new Player02(new DiceAImpl());//계속 내가 new라는 키워드로 실체클래스를 코드에 노출 시킵니다. 이걸 DI에게 권한을 줍니다.
		player01.playDice(3);
		System.out.println("=======================");
		System.out.println("선택된 주사위 수의 통합은 : "+player01.getTotalValue());
		System.out.println("=======================");

		Player02 player02 = new Player02(new DiceBImpl());
		player02.playDice(3);
		System.out.println("=======================");
		System.out.println("선택된 주사위 수의 통합은 : "+player02.getTotalValue());
		System.out.println("=======================");

		Player02 player03 = new Player02(new DiceCImpl());
		player03.playDice(3);
		System.out.println("=======================");
		System.out.println("선택된 주사위 수의 통합은 : "+player03.getTotalValue());
		System.out.println("=======================");

	}
}//end of class
위코드는 아직까지도 실체객체명이 노출되어 있어 재사용성이 떨어집니다. 이것을 bean configuration을 작성하고 Bean factory를 이용해서 작성해봅니다.
diceservice.xml
<?xml version="1.0" encoding="UTF-8"?>
<beans xmlns="http://www.springframework.org/schema/beans"
	xmlns:xsi="http://www.w3.org/2001/XMLSchema-instance"
	xsi:schemaLocation="http://www.springframework.org/schema/beans http://www.springframework.org/schema/beans/spring-beans.xsd">

	<bean id ="diceA" class="spring.service.dice.impl.DiceAImpl" />
	<bean id ="diceB" class="spring.service.dice.impl.DiceBImpl" />
	<bean id ="diceC" class="spring.service.dice.impl.DiceCImpl" />

	<!-- player01: User Definition Bean: 생성자 주입 -->
	<!-- value - 단순 파라미터 주입 |ref-객체참조-->
	<bean id ="player01" class="spring.service.dice.play.Player02">
		<constructor-arg ref="diceA" />
	</bean>

	<bean id ="player02" class="spring.service.dice.play.Player02">
		<constructor-arg ref="diceB" />
	</bean>

	<bean id ="player03" class="spring.service.dice.play.Player02">
		<constructor-arg ref="diceC" />
	</bean>

	<bean id ="player04" class="spring.service.dice.play.Player02">
		<constructor-arg ref="diceA" />
	</bean>

</beans>
DiceTestAppUseSprirng.java
package spring.service.dice.test;

import java.io.FileInputStream;
import java.io.FileNotFoundException;
import java.io.IOException;
import java.util.Properties;

import org.springframework.beans.factory.BeanFactory;
import org.springframework.beans.factory.xml.XmlBeanFactory;
import org.springframework.core.io.FileSystemResource;

import spring.service.dice.play.Player02;

public class DiceTestAppUseSpring {
	public static void main(String[] args) {
		BeanFactory factory = new XmlBeanFactory(new FileSystemResource("./src/main/resources/config/diceservice.xml"));
		// xml 하나씩 하면서 이곳에서 하나씩 테스트한다...
		Player02 player01 = (Player02) factory.getBean("player01");
		player01.playDice(3);
		System.out.println("======================");
		System.out.println("선택된 주사위 수의 통합은 :" + player01.getTotalValue());
		System.out.println("=============\n\n");


		  Player02 player02 = (Player02)factory.getBean("player02");
		  player02.playDice(3); System.out.println("======================");
		  System.out.println("선택된 주사위 수의 통합은 :"+ player02.getTotalValue());
		  System.out.println("=============\n\n");


		  Player02 player03 = (Player02)factory.getBean("player03");
		  player03.playDice(3); System.out.println("======================");
		  System.out.println("선택된 주사위 수의 통합은 :"+ player03.getTotalValue());
		  System.out.println("=============\n\n");

		  Player02 player04 = (Player02)factory.getBean("player04");
		  player04.playDice(3); System.out.println("======================");
		  System.out.println("선택된 주사위 수의 통합은 :"+ player04.getTotalValue());
		  System.out.println("=============\n\n");


	}

}// end of class
여러개의 필드를 가지는 객체를 예제를 통해서 setter주입과 생성자 주입의 차이를 봅니다.
User.java
package spring.service.domain;

import java.io.Serializable;

/*
 * FileName : User.java
 *  -  User 의 정보 id / pwd / age 를 갖는 Value Object
 *  -  User 의 정보 id / pwd / age 를 갖는 domain / command Object
 *  -  User 의 정보 id / pwd / age 를 갖는 POJO
*/
// field가 여러개 되면, 생성자로 넣을때는 한꺼번에 넣을 수도 있고, setter로 넣을 수도 있다. 이걸 구분해야한다. 보통은 setter로 넣는다.

public class User{

	///Field
    private String userId; 			/* 회원 ID */
    private String password;     /* 비밀번호 */
    private int age;    					/* 나이 */

    ///Constructor
    public User() {
		System.out.println("\n::"+getClass().getName()+" 디폴트 생성자....");
	}
	public User(int age, String userId) {
		System.out.println("\n::"+getClass().getName()+" age,userId 인자 받는 생성자....");
		this.age = age;
		this.userId = userId;
	}
	public User(int age, String password, String userId) {
		System.out.println("\n::"+getClass().getName()+"age,password,userId 인자 받는 생성자");
		this.age = age;
		this.password = password;
		this.userId = userId;
	}
	public User(String password, String userId) {
		System.out.println("\n::"+getClass().getName()+"age,password,userId 인자 받는 생성자");
		this.password = password;
		this.userId = userId;
	}

	///Method (getter/setter)
	public String getUserId(){
		return this.userId;
	}
	public void setUserId( String userId ){
	   System.out.println("::"+getClass().getName()+".setUserId()");
	   this.userId= userId;
	}
	public String getPassword(){
	   return this.password;
	}
	public void setPassword( String password ){
	   System.out.println("::"+getClass().getName()+".setPassword()");
	   this.password= password;
	}
	public int getAge() {
		return age;
	}
	public void setAge(int age) {
        System.out.println("::"+getClass().getName()+".setAge()");
		this.age = age;
	}

	@Override
	public String toString() {
		return "UserVO [userId=" + userId + ", password=" + password + ", age="+ age + "]";
	}

}//end of class
userservice01.xml
<?xml version="1.0" encoding="UTF-8"?>
<beans xmlns="http://www.springframework.org/schema/beans"
	xmlns:xsi="http://www.w3.org/2001/XMLSchema-instance"
	xsi:schemaLocation="http://www.springframework.org/schema/beans http://www.springframework.org/schema/beans/spring-beans.xsd">

	<!-- 개발자 정의 인스턴스:: setter 단순 파라미터 주입, 01유저(id), 01(age) -->
	<bean id="user01" class="spring.service.domain.User">
		<property name="userId" value="01유저"></property>
		<property name="age" value="01"></property>
	</bean>

	<!-- API 인스턴스의 정의ㅣ:: 생성자를 통한 단순 파라미터 값 주입 -->
	<bean id ="password" class = "java.lang.String">
	<constructor-arg value ='7777' />
	</bean>

	<!-- 개발자 정의 인스턴스:: setter 단순 파라미터 주입, 02유저(id), 02(age), 7777(password) -->
	<bean id="user02" class="spring.service.domain.User">
		<property name="userId" value="02유저" />
		<property name="age" value="02" />
		<property name="password" ref="password" />
	</bean>

	<!-- 개발자 정의 인스턴스::DI가 없다.-->
	<bean id="user03" class="spring.service.domain.User" />

	<!-- 개발자 정의 인스턴스 user04:: 생성자 주입:: 04, 04유저.-->
	<!-- 생성자로 값을 주입할때 index, name, type 으로 구분지어서 넣어 줄수 있습니다. -->
	<bean id="user04" class="spring.service.domain.User">
		<constructor-arg value="04유저" index="1" />
		<constructor-arg value="04" index="0"/>
	</bean>

	<bean id="user05" class="spring.service.domain.User">
		<!-- <constructor-arg value="05유저" index="2" />
		<constructor-arg value="05" index="0"/>
		<constructor-arg value="0505" index="1"/> -->
		<!-- 결론: setter로 해라. -->
		<property name="age" value="05" />
		<property name="password" value="0505" />
		<property name="userId" value="05유저" />
	</bean>


</beans>
생성자로 값을 여러 개 주입할때, Index와 name, type 이 세가지 옵션을 사용할 수 있습니다.
UserTestApp01.java
package spring.service.test;

import org.springframework.beans.factory.BeanFactory;
import org.springframework.beans.factory.xml.XmlBeanFactory;
import org.springframework.context.ApplicationContext;
import org.springframework.context.support.ClassPathXmlApplicationContext;
import org.springframework.core.io.FileSystemResource;

import spring.service.domain.User;

public class UserTestApp01 {
	public static void main(String[] args) {
		/*
		 * BeanFactory는 객체를 getBean() 하는 순간에 생성함... 밑에꺼랑 비교해서 살펴보자!!! 호출되는 순서!!! 이 부분에서
		 * BeanFactory와 ApplicationContext에 대해서 비교 설명하고 넘어가자 (특히, PreLoading 하는게 왜 더
		 * 좋은지..was Servlet떄 우리는 이미 봤다. 서버 구동시 서블릿이 미리 로딩되어 있었다)
		 */

		/*
		 * BeanFactory factory = new XmlBeanFactory(new
		 * FileSystemResource("./src/main/resources/config/userservice01.xml"));
		 */

		/*
		 * 메타데이타를 읽어올떄 미리 인스턴스 생성해서 읽어온다... 다시 말해서 PreLoading하는데..이게 더 나은 방식.(현업에서는
		 * BeanFactory 안쓴다) Was 의 경우에서 처럼, 서버 구동할때 DD 파일 읽어서 한번에 서블릿을 다 미리 만들어 놓는다...그것과
		 * 같은 방식이다. 이처럼 ApplicationContext는 BeanFactory의 자식으로 더 나은 기능들이 있는데...하나씩 차차
		 * 보게될것이다. 특히나 파일 시스템이 아니라 바로 클래스 패스 잡혀진 곳으로 파일이 들어오기에 바로 소스 밑부터 찾으면 된다..자바의 기본
		 * 방식.
		 */
		ApplicationContext factory = new ClassPathXmlApplicationContext("/config/userservice01.xml");

		System.out.println("\n=============================================================================");
		User user01 = (User) factory.getBean("user01");
		System.out.println(user01);

		System.out.println("\n=============================================================================");
		User user02 = (User) factory.getBean("user02");
		System.out.println(user02);

		System.out.println("\n=============================================================================");
		User user03 = (User) factory.getBean("user03");
		System.out.println(user03);

		System.out.println("\n=============================================================================");
		User user04 = (User) factory.getBean("user04");
		System.out.println(user04);

		System.out.println("\n=============================================================================");
		User user05 = (User) factory.getBean("user05");
		System.out.println(user05);

	}

}
loading 방식
1) Lazy loading
BeanFactory factory = new XmlBeanFactory(new FileSystemResource("./src/main/resources/config/userservice01.xml"));
FilePathSystem --src부터 다시 인식 시켜야한다.
2) Pre loading---> 이걸 씁니다.
ApplicationContext factory = new ClassPathXmlApplicationContext("/config/userservice01.xml");
ClassPathSystem --src를 이미 먹고 들어간다.
setter vs constructor(spring에서는 무조건 기본 생성자가 있어야합니다.)
- constructor 주입은 실수하기 쉽습니다. 그렇기 때문에 setter 주입을 더 선호하게 됩니다.